On your big day, you walk down the aisle supported by the most-loved ladies in your life — otherwise known as your bridal party. Each woman is perfectly dressed in coordinated gowns and shoes, with complementary hair styles and beautiful bouquets. But what about jewelry? Providing earrings and necklaces is a common and much appreciated gift from a bride to her attendants, and there are many gorgeous options from which to choose (our favorite go-to spot for fine jewelry is Darrah Cooper in Lake Placid).
For crafty brides who like the idea of homemade jewelry, recent bride Eva Mizer created this do-it-yourself tutorial. Utilizing only wire and a handful of inexpensive beads, these earrings can complete the look of your entire bridal party!

Before you begin, you will need to plan out which design and colors best suits your needs. For this project, we used a mix of blue, opaque, and clear beads to create a simple dangling chandelier design.
For this set of three, which includes the bride, maid of honor, and bridesmaid’s earrings, you will need wire cutters, needle-nose pliers, a spool of 20 mm gauge silver wire, six hooks, 12 tiny beads, eight small opaque beads, 10 medium clear beads, eight medium-wired blue beads, two large-wired blue beads, and 16 “O” rings.

Side Tier:
1. Set out the beads in the design you will be using.
2. Cut a 1-inch section of wire and close one end by twirling it in a circle with the needle-nose pliers.
3. Take the one tiny bead and one small opaque bead and slide them onto the wire.
4. Cut the wire and curl the end as in step two.
5. Repeat steps #2-4 with a medium clear bead.
6. Open an “O” ring and loop it through the end of the first segment and the top the second segment and close it.
7. Repeat step #6 with the second segment and a medium-wired blue bead.
8. Open the curl on the bottom of the earring hook and loop it through the top curl of the first segment and close it.
9. Repeat steps #1-9 for the second tier.
Middle Tier:
1. Set out the beads in the design you will be using.
2. Cut a 1-inch section of wire and close one end by twirling it in a circle with the needle-nose pliers.
3. Take one small opaque bead and slide it onto the wire.
4. Cut the wire and curl the end as in step two.
5. Repeat steps #2-4 with a medium clear bead.
6. Open an “O” ring and loop it through the end of the first segment and the top the second segment and close it.
7. Repeat step #6 with the second segment and a large-wired blue bead.
8. Open the curl on the bottom of the earring hook and loop it through the top curl of the first segment and close it.
Wire Top:
1. Cut a segment of wire about 4 inches in length.
2. Lightly put the ends of the wire together and bend it at the middle, creating an elongated loop at the center.
3. Curl the ends of the wire up, but don’t close them all of the way.
4. Cut a segment of wire about 3 inches in length and repeat step #2.
5. Curl the ends of the wire perpendicularly, so they will be able to wrap around the back.
6. Place the bended wire (now in a downward “V”) to rest on the previous wire (now in an upward “V”), so the curled ends of the second wire are fastened in the curled ends of the previous wire. Keep the curls of the previous segment open.
7. Loop the open curls of the previous segment through the top curl of the side tiers. Close the curls, keeping ample room for the second segment and side tier to move.
8. Take the middle tier. Open the curl of the top segment of the tier and loop it through the middle loop of the downward-facing “V” wire segment. Close it.
9. Open the curl on the bottom of the earring hook and loop it through the top loop of the upside down “V” segment and close it.
10. Repeat all steps for the second earring.
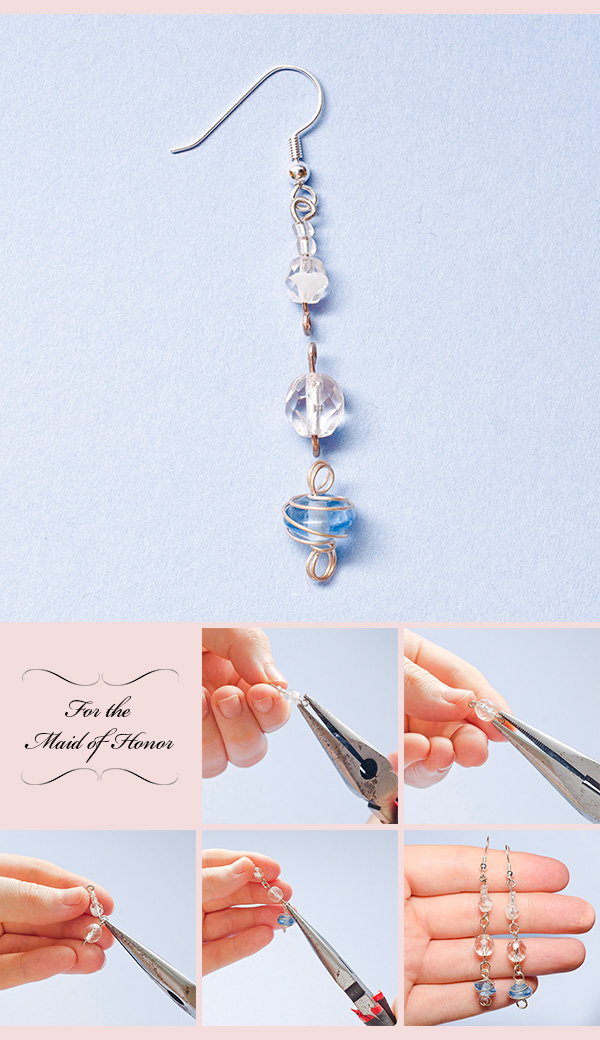
1. Set out the beads in the design you will be using.
2. Cut a 1-inch section of wire and close one end by twirling it in a circle with the needle-nose pliers.
3. Take the two tiny beads and one small opaque bead and slide them onto the wire.
4. Cut the wire and curl the end as in step two.
5. Repeat steps #2-4 with a medium clear bead.
6. Open an “O” ring and loop it through the end of the first segment and the top of the second segment and close it.
7. Repeat step #6 with the second segment and a medium-wired blue bead.
8. Open the curl on the bottom of the earring hook and loop it through the top curl of the first segment and close it.
9. Repeat steps #1-9 for the second earring.
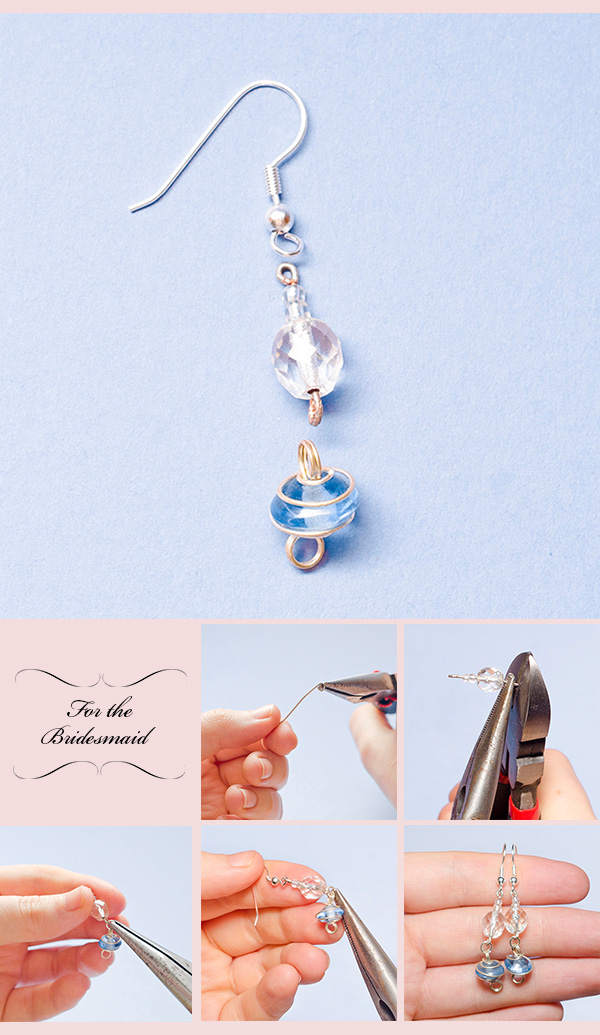
1. Set out the beads in the design you will be using.
2. Cut a 1-inch section of wire and close one end by twirling it in a circle with the needle-nose pliers.
3. Take the two tiny beads and one medium clear bead and slide them onto the wire.
4. Cut the wire and curl the end as in step two.
5. Open an “O” ring and loop it through the end of the previous segment and the top of a medium-wired blue bead and close it.
6. Open the curl on the bottom of the earring hook and loop it through the top curl of the first segment and close it.
7. Repeat steps #1-6.

We love DIY projects such as this one because they help you get in touch with your creative side, and this project comes with the bonus of serving as a gift that commemorates your special day. Happy crafting!
— Story and photos by Eva Mizer. Layout and story editing by Heidi LaPoint.


