Autumn is undeniably a lovely time of year for an Adirondack wedding. Bright hues of gold, crimson, and orange color every leaf, seemingly overnight. Peak leaf dates can be hard to pinpoint, however; no matter how precisely you plan, unpredictable weather can cause leaves to turn too soon or too long after your special day.
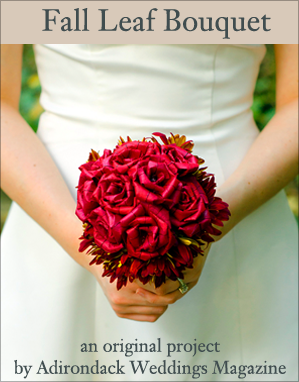
Fortunately, there is a way to guarantee that a vivid palette of fall foliage takes center stage on your wedding day: create a bridal bouquet made of real leaves!


The best kind of leaves to use are preserved, treated leaves, which you can get from your local florist or purchase online.
Leaves from your backyard won’t hold their form for more than a few hours, so unless a professional is making the bouquet on the morning of the wedding, we strongly recommend choosing preserved leaves. Sugar Maple leaves are a great choice because their broad tiers are easier to shape than the thinner tiers of other types of Maple leaves. This tutorial uses Silver Maple leaves, which have been both dyed and preserved. You’ll also need scissors, glue (hot glue works best), floral tape, and twigs, along with a good dose of patience and willingness to experiment.


1. Start off with a single leaf and iron out any wrinkles so you have a flat leaf to work with. We set our iron at medium heat with steam. Be sure to test the iron out on a sample leaf first.
2. Once flat, place a dab of glue on the lowest tier of the top three tiers of the leaf (for Sugar Maple, focus on the three branches in the top center). You can use hot glue or regular glue, but we encourage hot glue for speed and ease.
3. Bend the tier with the glue down to the center of the leaf, and hold until set.
4. Place a dab of glue on top of the leaf that you just set, or on the second-highest tier.
5. Bend the tier over to the center on top of the first tier and hold until set.
6. Repeat for the final center tier.
7. Once all tiers are set in place, cut the excess leaf off on one side.
8. Repeat for other side.
9. You should now be left with the folded tiers in the shape of a rounded triangle. Repeat this with leaves of many sizes ranging from extra small to extra large if possible.
10. Starting with the smallest leaves, flip the leaves over (so the previously glued sections are not visible) and put a dab of glue on the center bottom of the leaf.
11. Wrap the leaf around a stick (we used the branches and twigs that came with the preserved leaves).
12. Repeat, continuing with larger and larger leaves, turning the rose around to keep the bloom even and natural-looking.
13. Once all is glued, add floral tape for more security.
14. Once you have about 7-10 petals on your rose, you’re finished!
15. Repeat until you have at least 10 flowers, and wrap them securely with floral tape.
Congratulations! You now have a lovely bouquet of fall foliage. Each leaf can take about 30 minutes to perfect, but the end result will be a completely unique bouquet. For added color and texture, add seasonal flowers around the edges and secure them with floral tape. Wrap the bouquet in colored ribbon of your choice for a finished, professional look.
Store your final product at room temperature in a dry location that is safe from hazards (pets, kids, items falling off shelves, etc.). If you love how it turned out, the same technique can be used to make centerpieces and boutonnieres. If you’d like to share your results with our readers, feel free to send your photos to editor@adirondack-weddings.com. Happy crafting!
Photography and tutorial by Eva Mizer.